
Many years ago I bought a bargain second hand Napoleon at Fontainebleau model via Ebay, that, as I discovered, was a 90mm Andrea figure.
The original pose
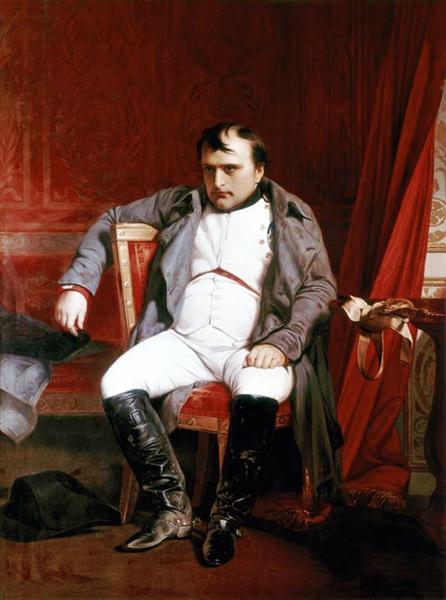
The miniature was inspired by the famous 1840 DeLaRoche-painting, above. It’s his artist’s impression, a fantasy. On March, 30th, 1814 the Allied powers occupied Paris. Napoleon went to Fontainebleau. His marshals refused to carry on. Bourienne, Napoleon secretary, writes about the fateful day in 1814. Napoleon,
‘after having spent a part of the night at Froidmanteau “he repaired to Fontainebleau, where he arrived at six in the morning. He did not order the great apartments of the castle to be opened, but went up to his favourite little apartment, where he shut himself up, and remained alone during the whole of the 31st of March”, 1814.
He abdicated April, 6th.
DelaRoche studied Bourriene’s Memoires and apparently also was inspired by a 1839 Horace Vernet (his father-in-law) illustration:


But Delaroche’s painting doesn’t depict the 6th of April abdication (as above) but the 31st of March: a disillusioned, defeated, abandoned Napoleon in his private apartment, realizing his cause is lost. It’s a powerful artist’s impression.
German literary critic, Heinrich Heine, wrote: “[Delaroche] has no great predilection for the past in itself, but for its representation, for the illustration of spirit, and for writing history in colours.” According to a Wikipedia article, Delaroche carefully researched the costumes and accessories and settings he included in his paintings in order to accurately present his subject. “The public eye is less observant of fine details and nuances in painting, but Delaroche appreciated the literary value of his paintings over their pictorial value.”
I noticed, by the way, some facial similarities between Delaroche and Delaroche’s Napoleon, in particular the hair 🙂
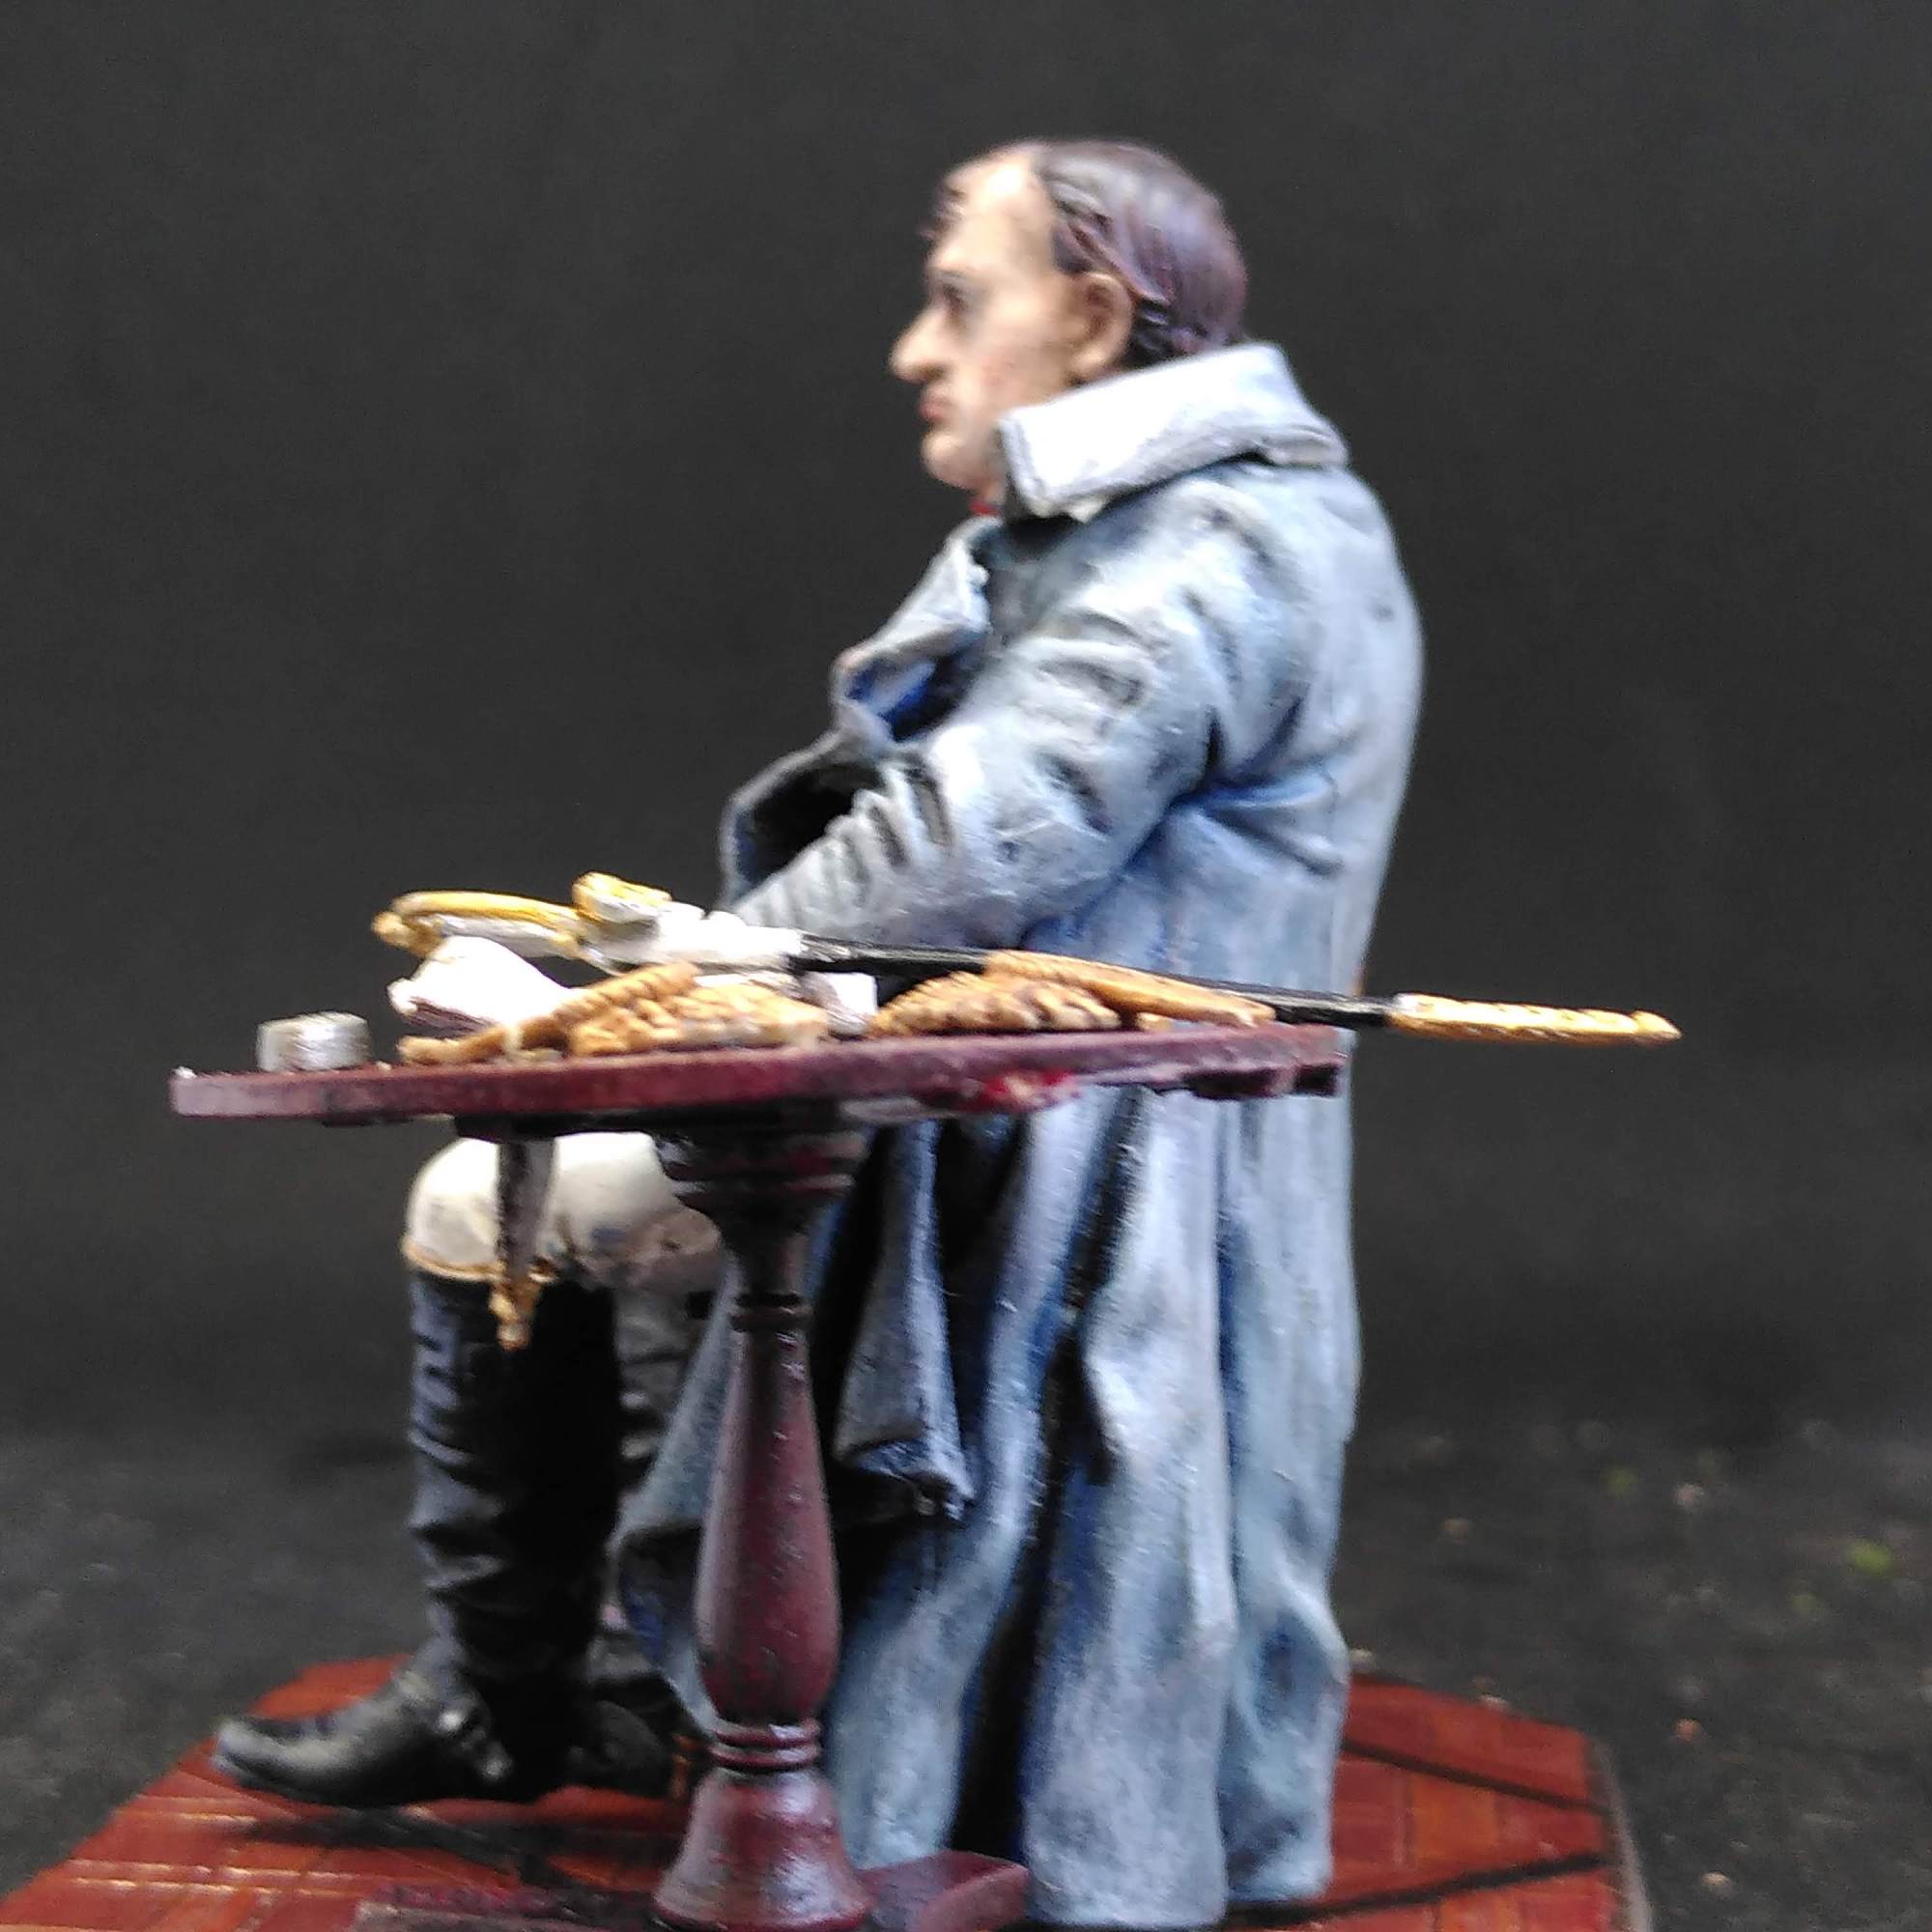
the andrea miniature
The miniature is beautiful, very well sculpted. However, I find it sometimes hard to believe that my figure is an original. Is it a recast? Or an old now out-of-production model? Only (as I remember) 25 euros, no official box, not 30 metal parts but fewer, all resin: strange. Next time I will buy directly from the company or an official reseller. I don’t promote recasting.
Shortly after buying, seven years ago, I assembled the model. Stephen Jamison describes in detail how to assemble the figure (be careful with of the right arm). I did some prepainting, then got distracted or bored – and forgot it. Here’s what I found back, stacked in a box.
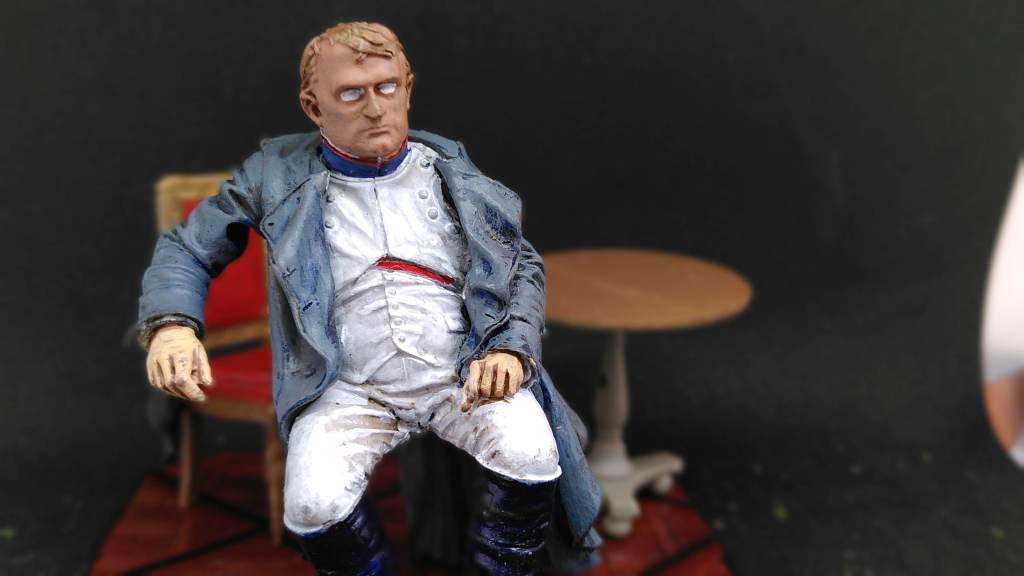
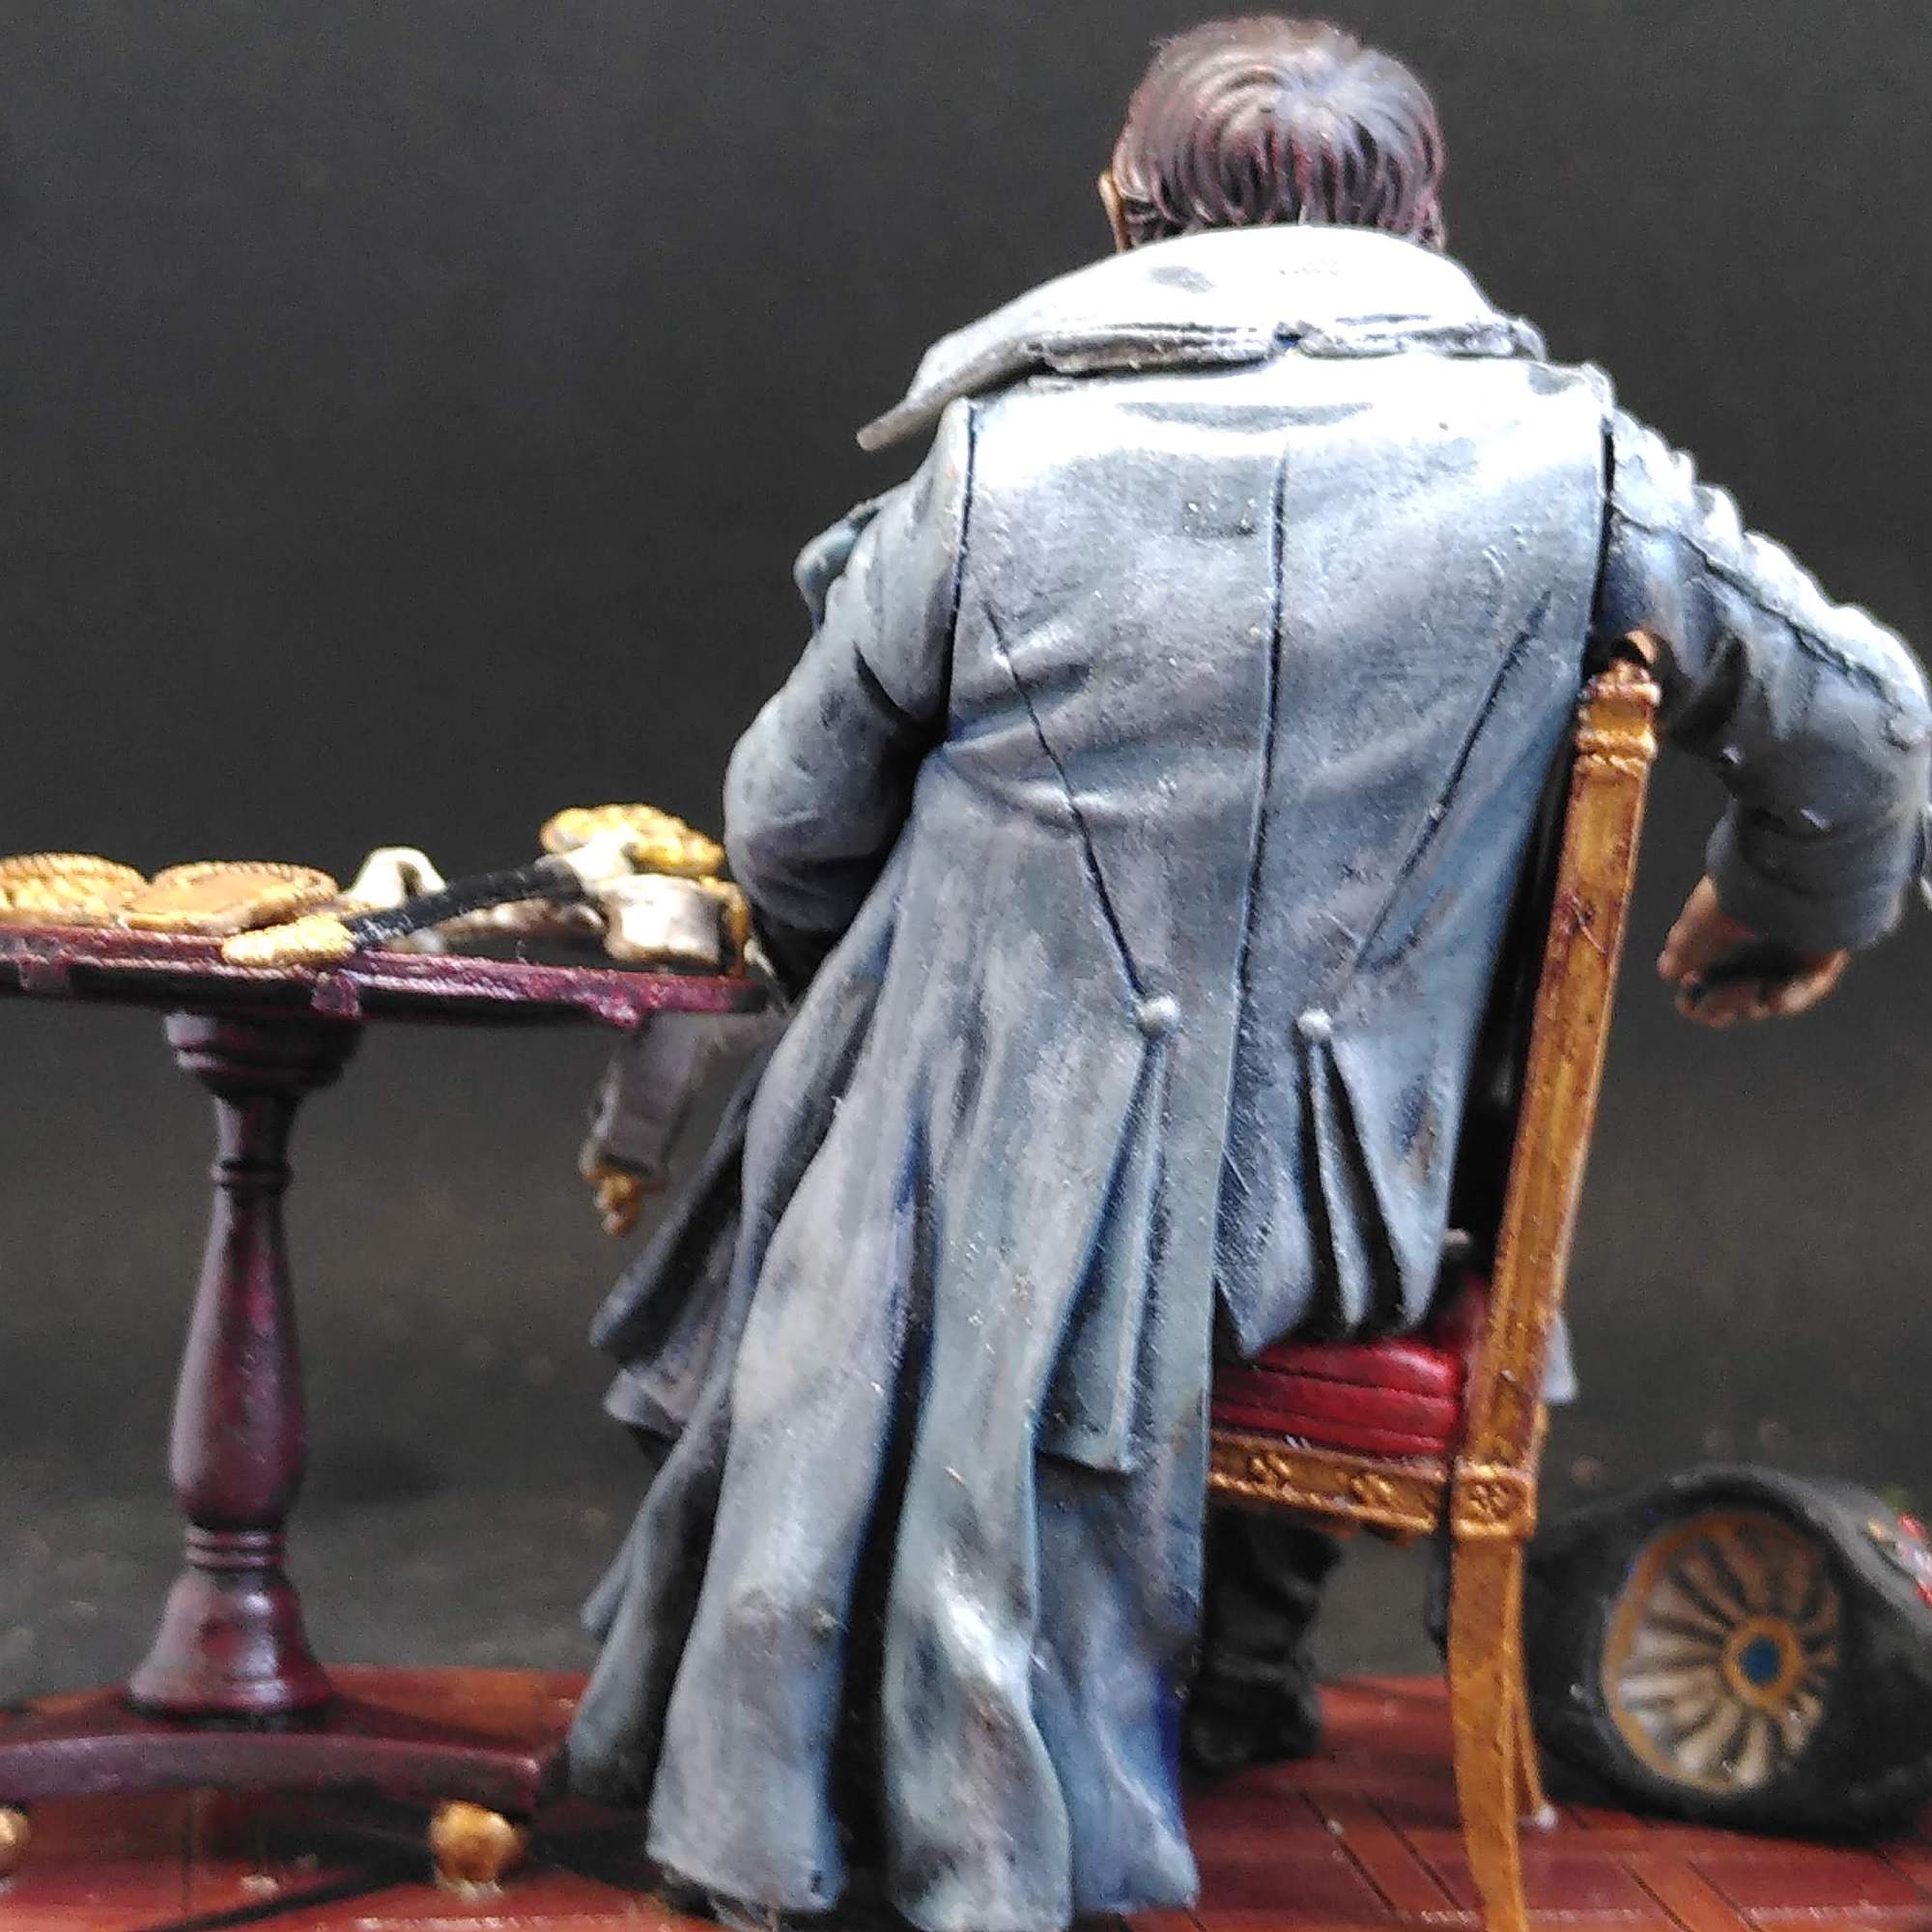
I now fully finished the parquet floor and gave it a gloss varnish to get a polished wood effect. Ditto with the table, and later with the laquered white sword belt and sword.
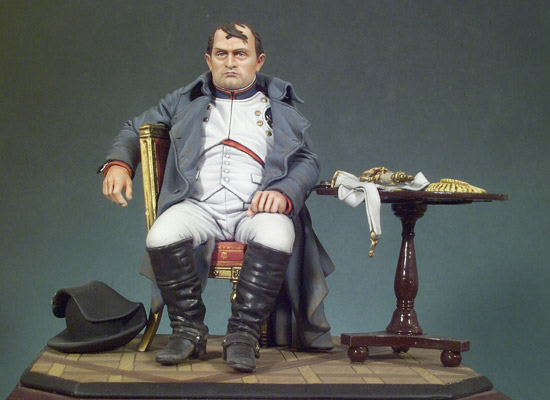
With slow drying hobby glue – no super glue – I carefully positioned the blockpainted figure and fixed the figure to the chair. Basic steps done. Normally I speedpaint, therefore I am, so I really had to rethink my painting strategy. I never painted 90mm before. While preparing, I googled for examples and found two inspiring pictures and the original and I studied the art of face painting.
Painting the face
The focal point of the model is the face, as you see. Although an amateur I strived for a higher standard this time than my standard speedpaint approach. A fantastic airbrush facepaint tutorial is here:
I have no airbrush, sadly. I found many other tutorials online:, I can recommend Squidmar‘s channel if you want a vlog, and Wamp and Tale of Painters if you want a static web page. I also own a guidebook about painting wargame miniatures ( Valero, Javier Gomez. Painting Wargaming Figures; Pen and Sword. Kindle Edition) that I reread.
For my amateur attempt and for other amateurs I summarized and merged the tips. Squidmar showed the dark & light areas on a bust. Useful.
The 5 skin colours
Squidmar and Wamp showed their palette:

the right order: Eyes first!
Javier Gomez Valero recommends (in Painting Wargaming Figures) the following painting order: 1) Base colour; 2) Eyes; 3) First highlight; 4) Mouth and lower lip; 5) Second highlight; 6) Hair, moustaches, teeth, and other detail.
He paints eyes first, not last:
“Many people prefer to paint them as the very last step, when the rest of the face is finished. However, painting eyes is problematic and, even if you are very confident and experienced, it’s easy to do it wrong at the first attempt: if the face is already painted, that would ruin part of an already complete paint job. On the other hand, if we paint the eyes now, we could easily correct them if something goes wrong.”
How to detail the eyes
D Powell from Wamp primes the head, basecoats with medium flesh (Vallejo Rosy Shadow), shadowed the eyes ( “No sense spending an hour to get the eyes right only for a quick slip with your skin shadow to ruin it all”). Chestnut Brown around the eyes, under the cheeks, nose, and chin, and then around the mouth. Dark (Mahogany) Brown is used to further deepen the shadows under the brows, in the nostrils, and under the chin.
Powell is more detailed than Valero.
Valero paints a white eyeball, then a T-shaped pupil, that’s it: Powell shadows first the eye socket with two different browns, then paints a pink eyeball, then paints an off-white eyeball with traces of the pink in the corners of the eye, then a dark brown shadow on the upper eyelid and a medium brown on the lower eyelid, then the iris and then the pupil. I followed Powell but used a brown wash
skin, cheeks, mouth, step by step
Powell/Wamp published a step-by-step picture that I used as guideline.
Wamp, Valero, Squidmar first apply the hard shadows and then drybrush/highlight thin layers of lighter flesh tones. My usual speedpainting technique is basic skin tone, wash or dip and some drybrushing, maybe with a highlight on nose, forehead and chin, quite hard contrast on 15mm and 28mm faces. The Wamp/Valero/Squidmar-technique is a more layered, 5-tone approach. Wamp describes this very well:
Through a number of thin layers I blend the shadows that I’d previously sketched on into the rest of the face. While they may stay dark under the brow, nose, and chin in many other places they become quite subtle. From here I start to gradually blend in my highlight, Fair Skin, into the base tone.
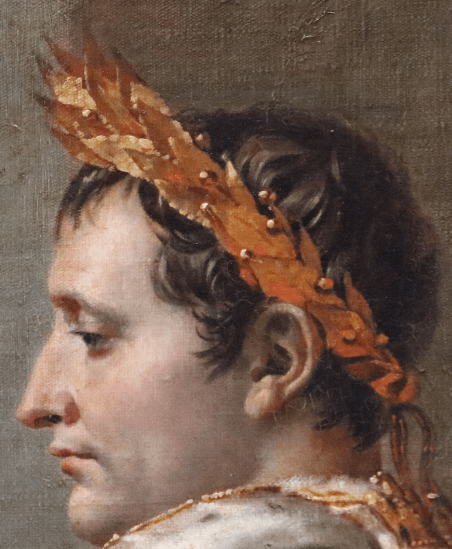
What was Napoleon’s historical hair, skin and eye colour?
Just as I want my battalions to wear the right historical cuff colour, my miniature Napoleon should have the authentic hair, skin and eye colour. I googled historical descriptions of Napoleon. Different observers wrote:
The hair on his head was not black, but dark reddish-blond; his eyebrows and eyelashes were much darker than the colour of his hair, and his blue eyes, set off by the almost black lashes, gave him a most pleasing expression.
He is very sallow, with light grey eyes, and rather thin, greasy-looking brown hair,
He looked me full in the face which gave me an opportunity to observe the colour of his eyes which are lighter, and more of a blue grey, than I should have expected from his complexion [“His complexion is not as I have heard it described waxy, but though wanting in colour sufficiently healthy.”
[his face was] “pale even to sallowness, (…) and so penetrating a seriousness, or rather sadness, as powerfully to sink into an observer’s mind.’ She also described his demeanor as ‘more the air of a student than a warrior.’
His eyes are light grey, and he looks full in the face of the person to whom he speaks.
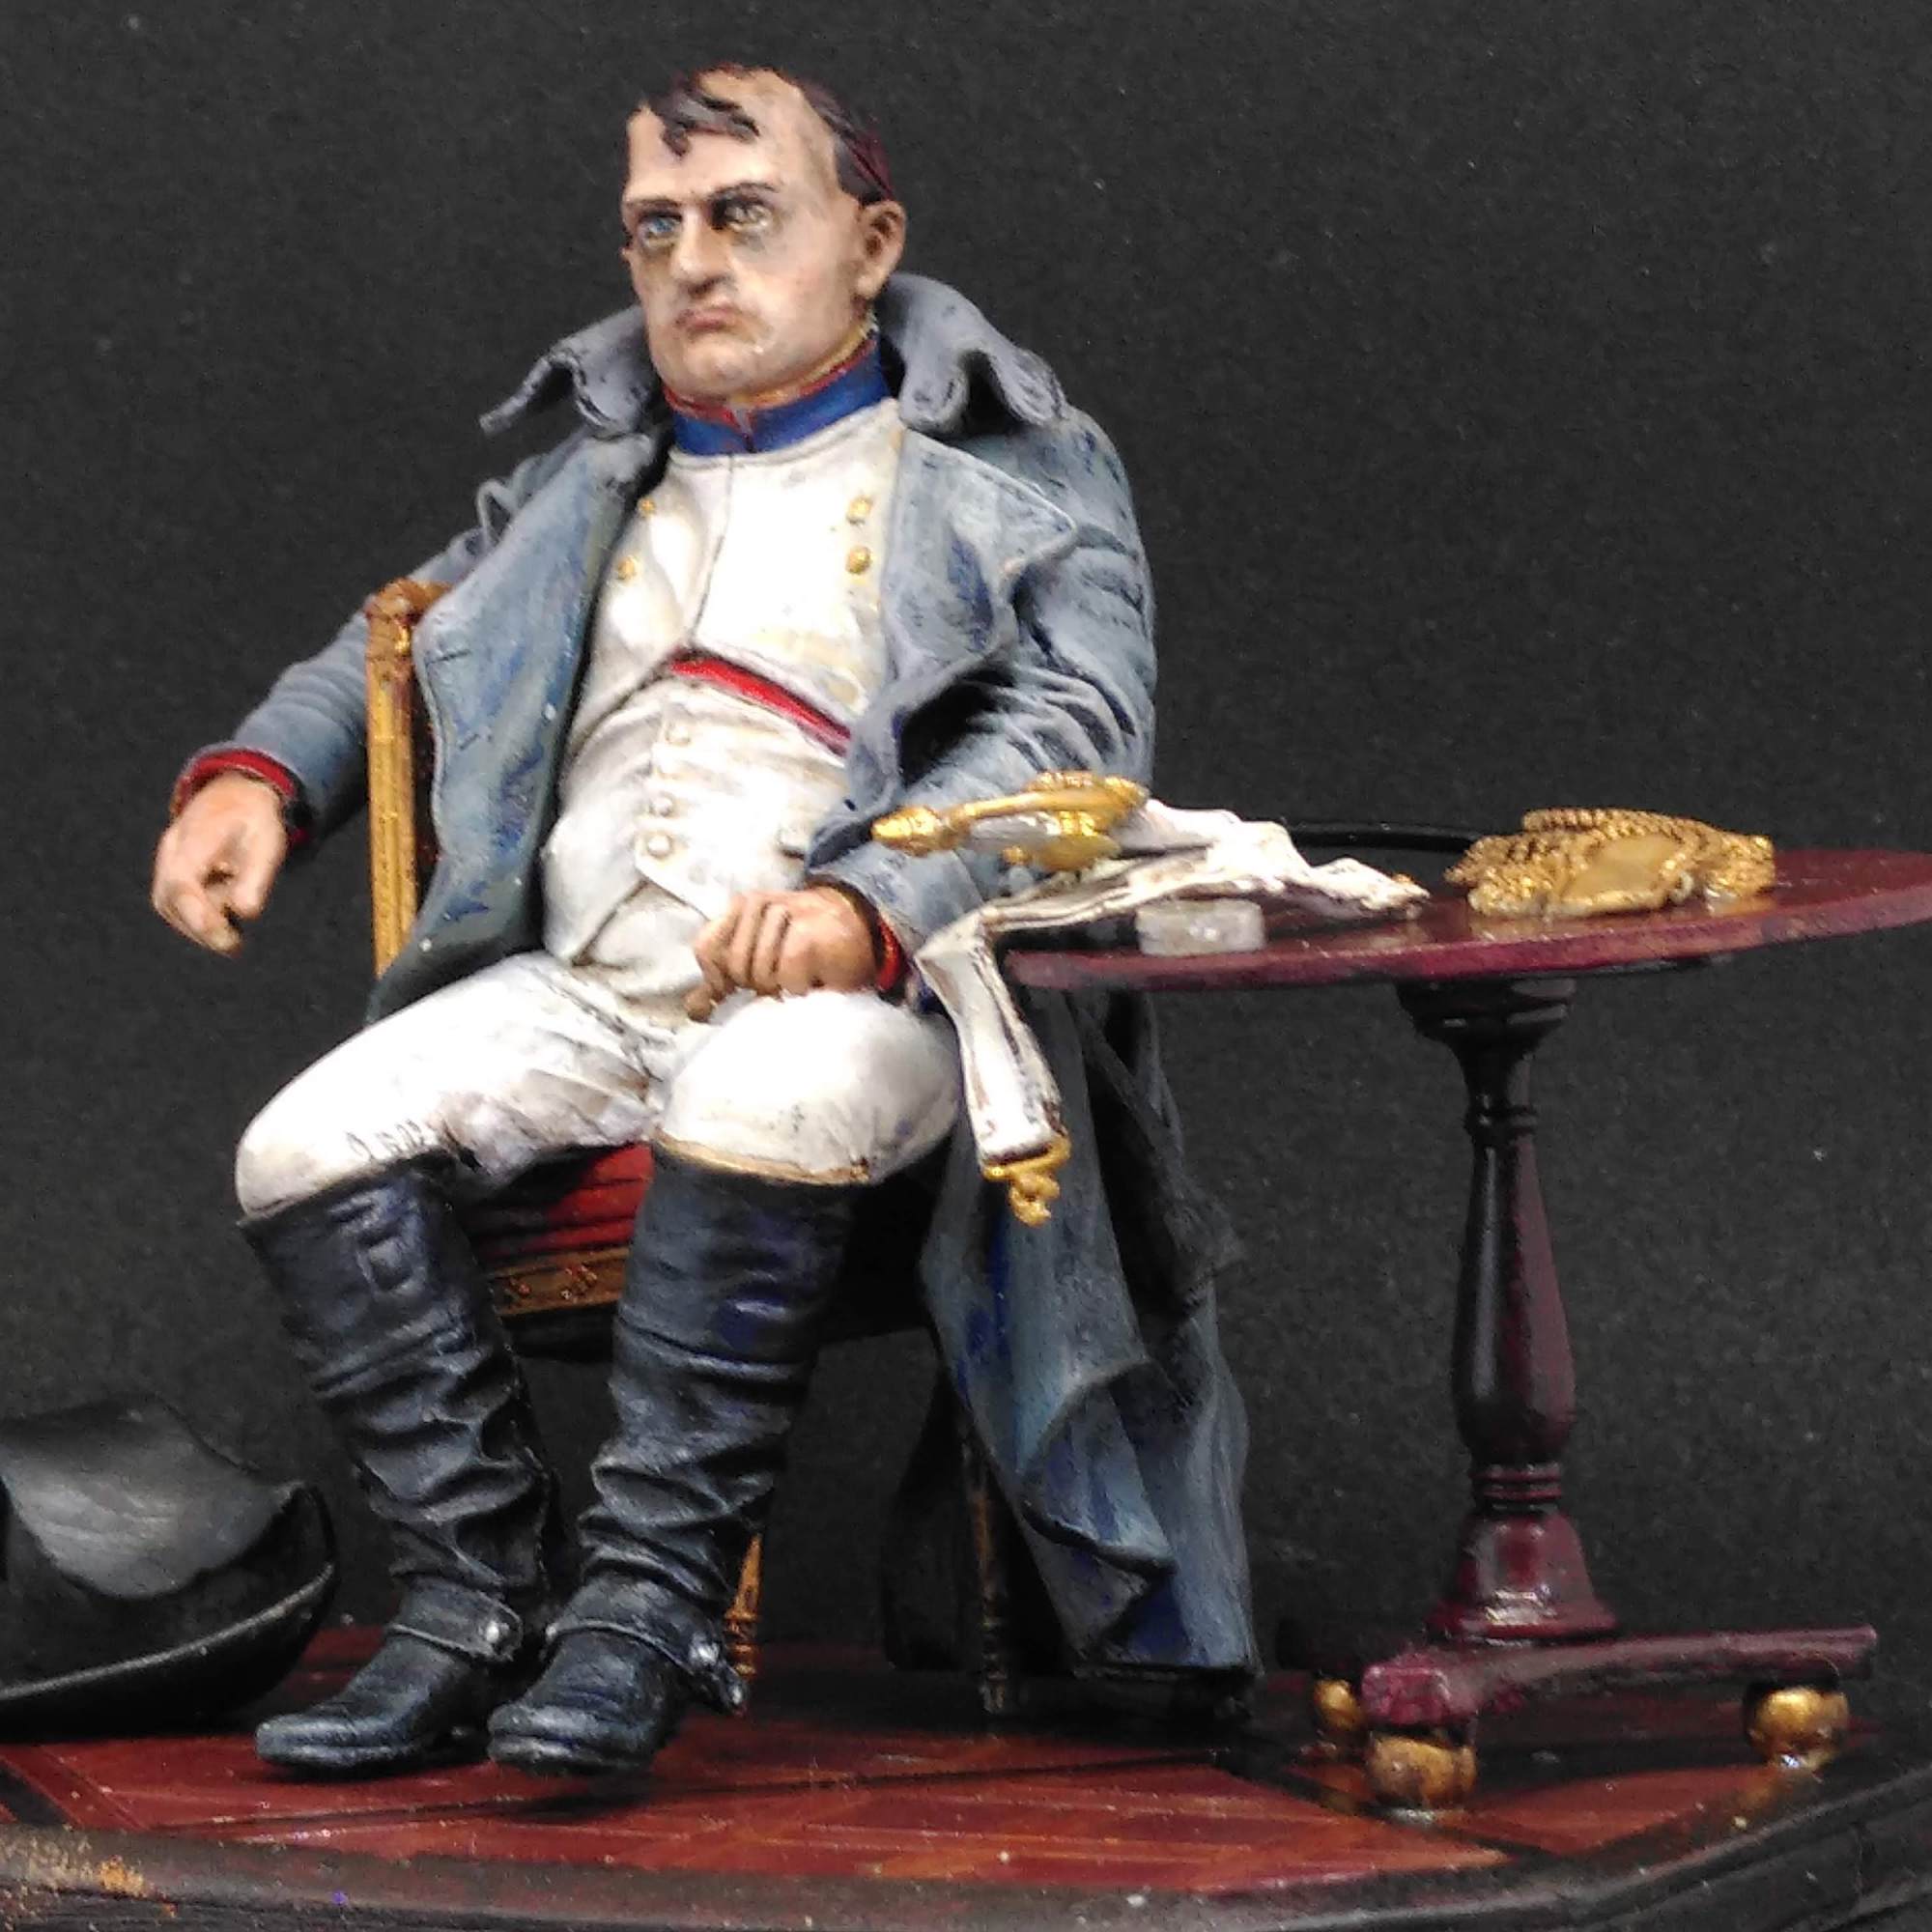
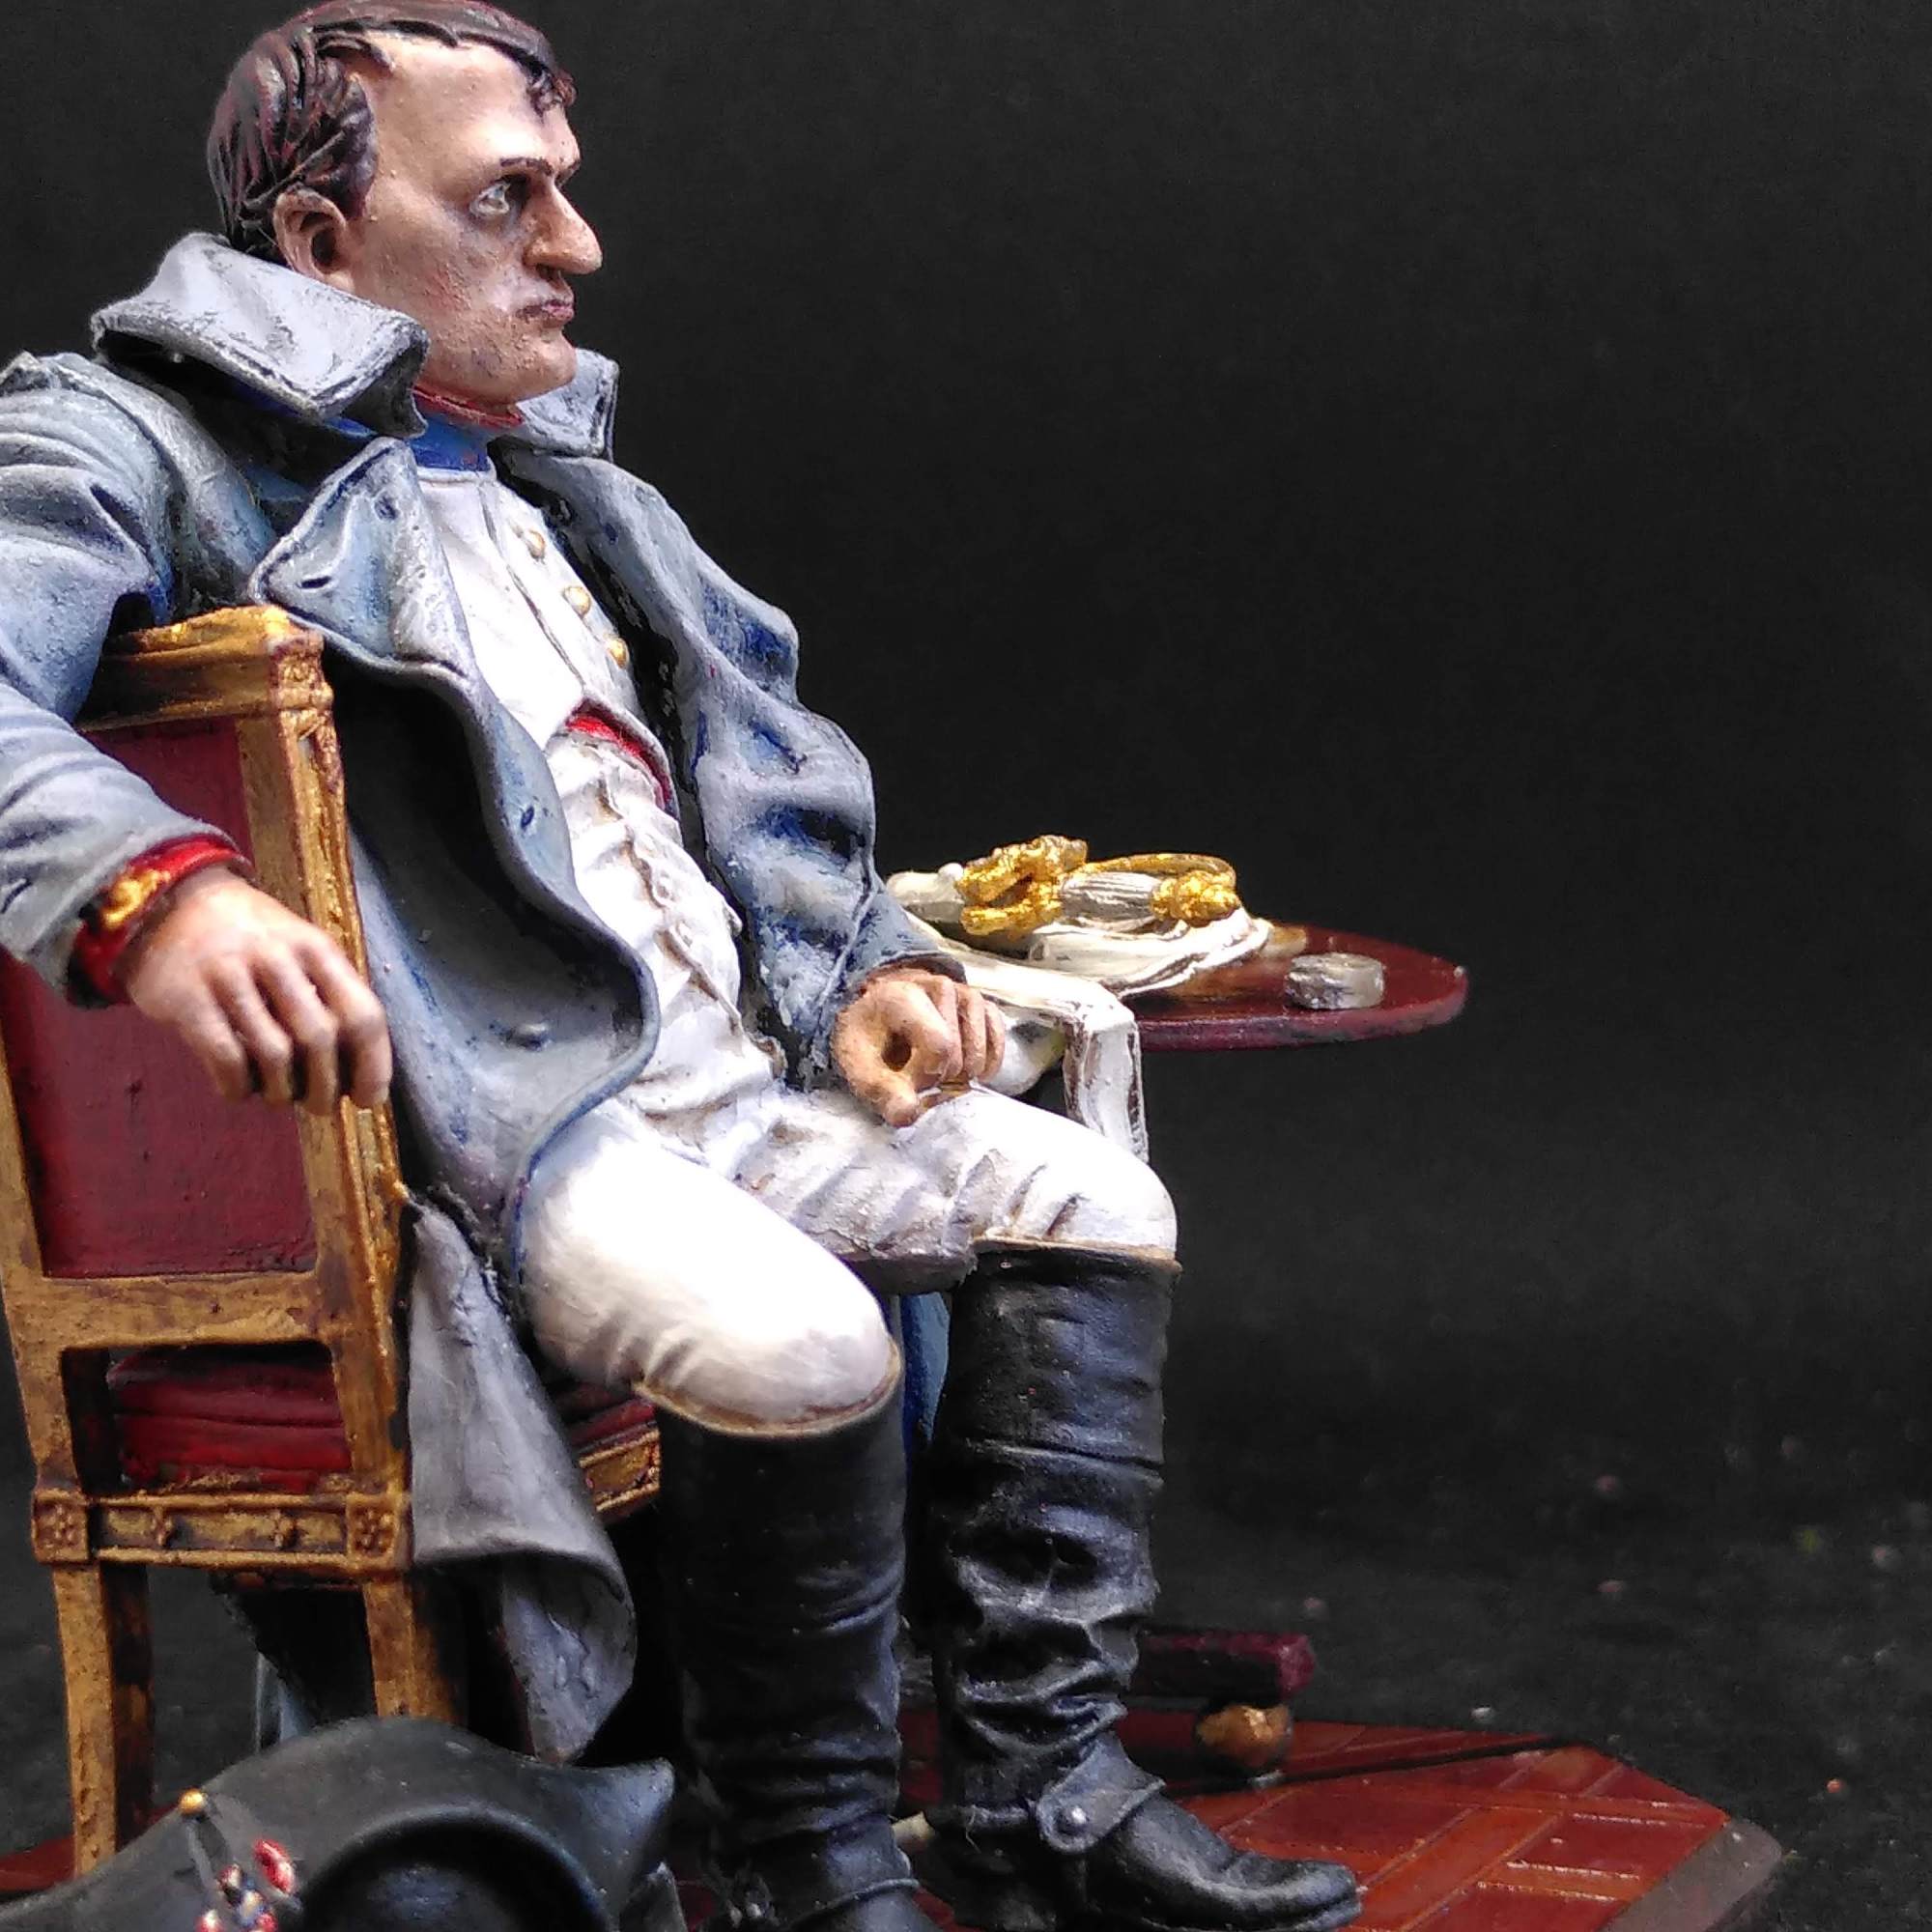
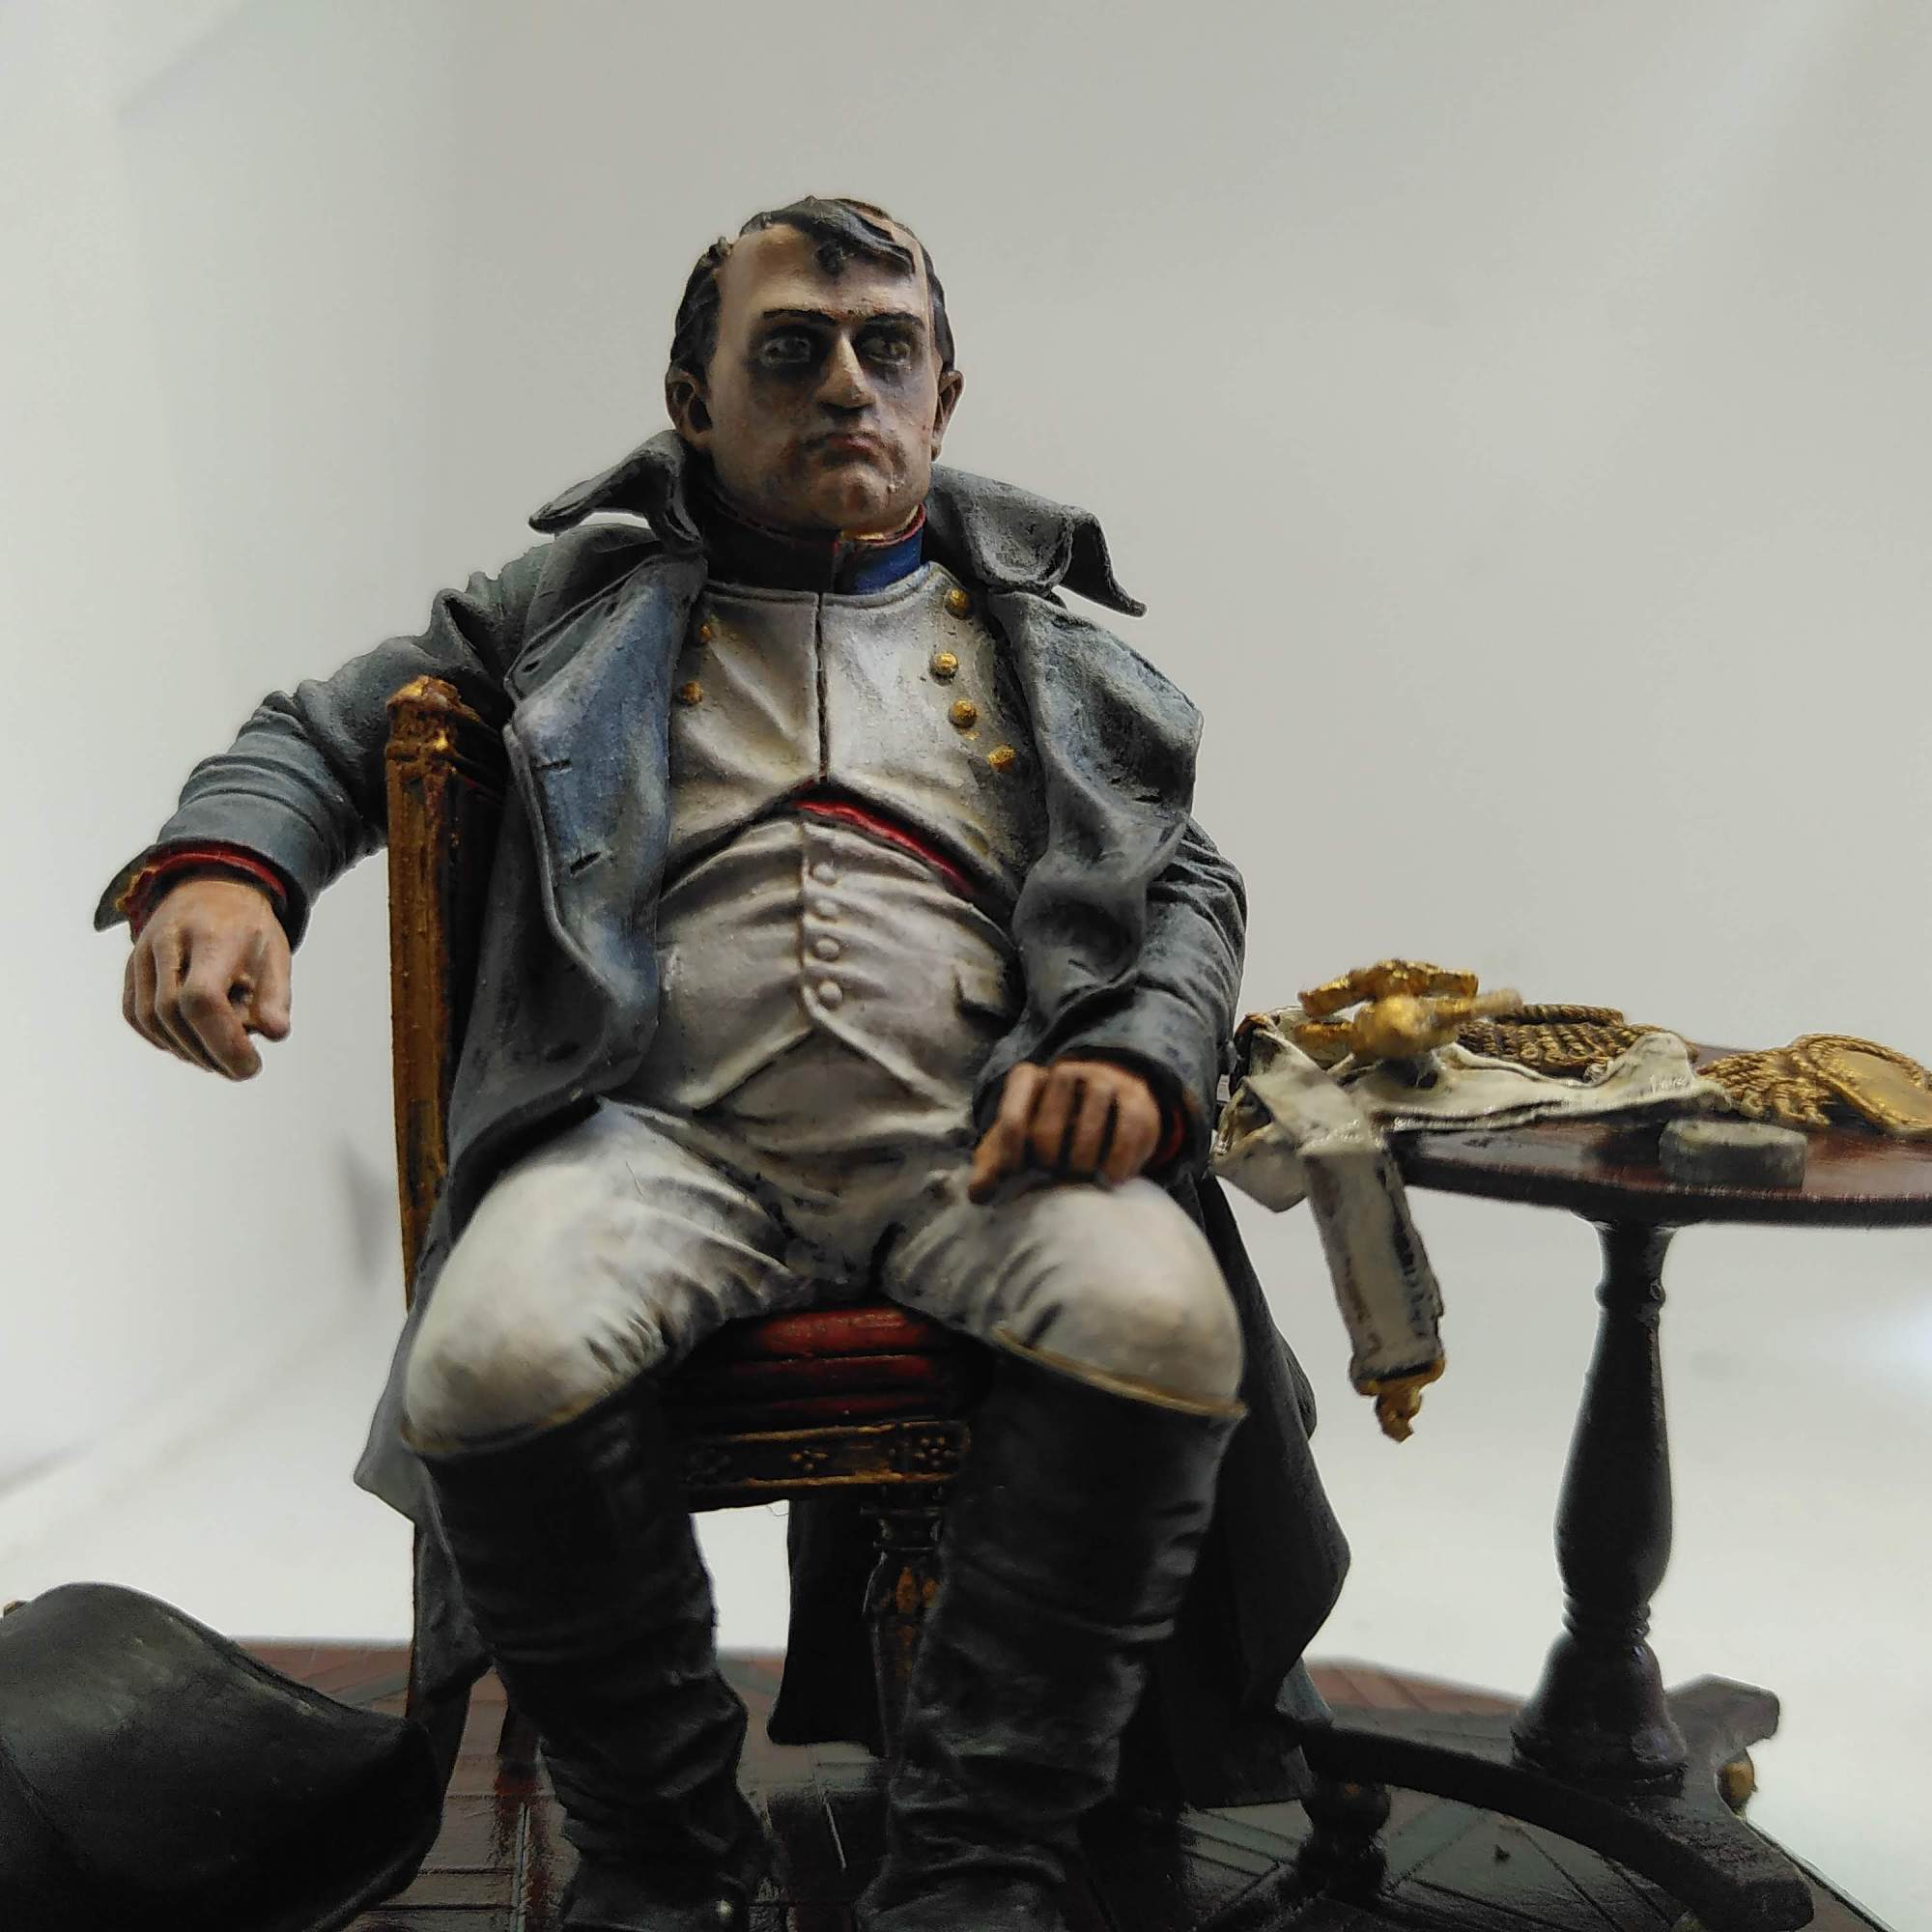
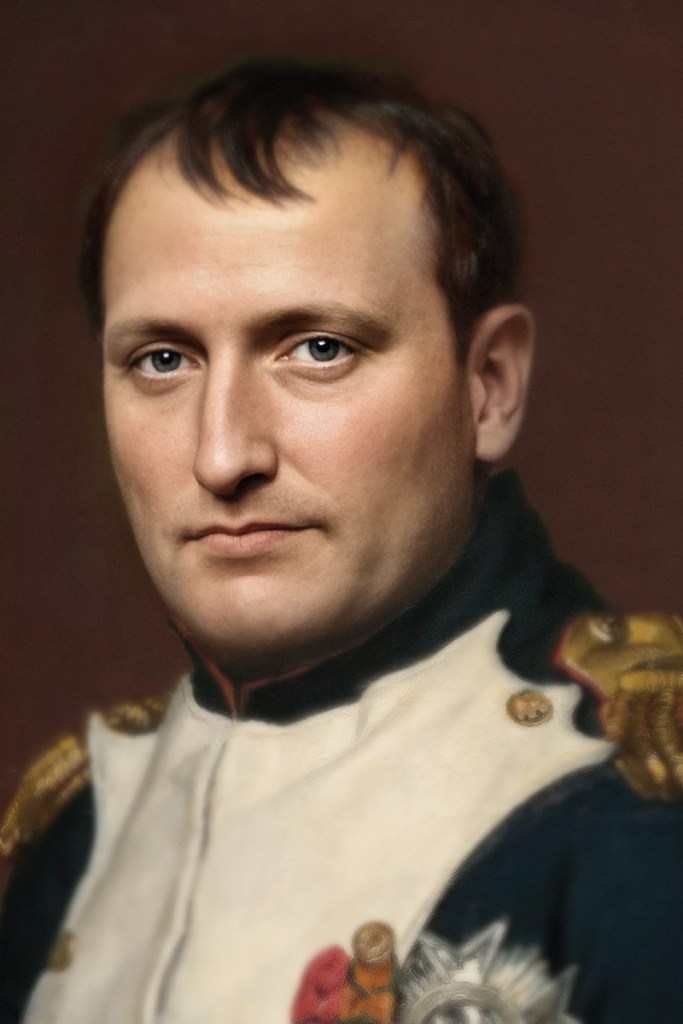
I corrected the white eyeballs with off-white and added heavy shadows. . Lips flesh with red and a highlight. I painted light blue eyes, a pale skin and dark brown hair with a nearly visible chestnut higlight. I copied David’s colour, very dark brown with a red tinge. See also the AI-generated portrait, below. Not DeLaRoche-artist-black.
Here’s my step-by-step process.
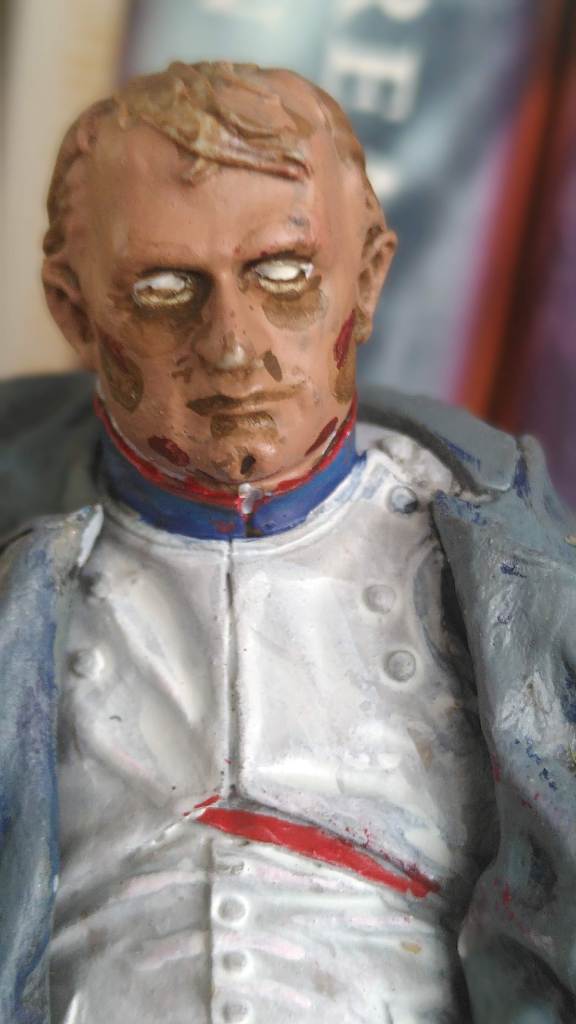
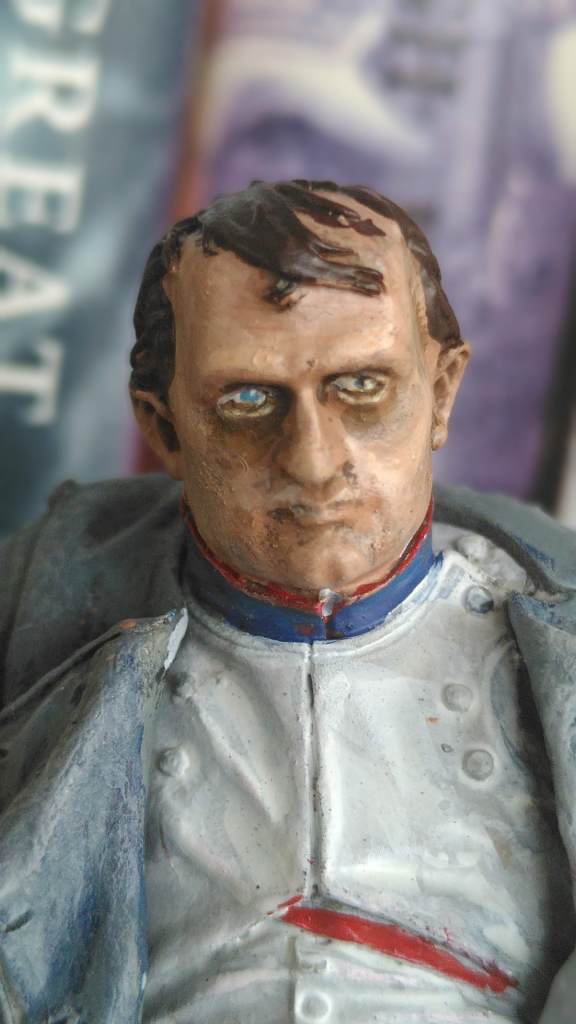
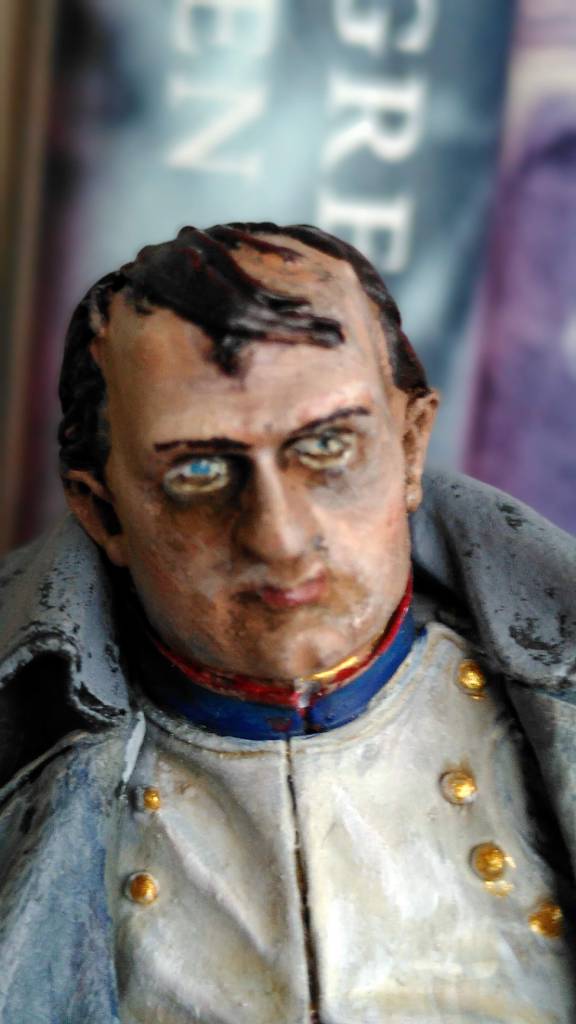

Basic fleshtone; hard shadows; then careful drybrushing in different layers following the pattern of the to Squidmar bust; finally lips, eyebrows, small corrections. Pale skin colour. I skipped the glazes and microscopic detailing that Powell/Wamp recommends. After a certain point I was afraid that extra corrections or colours would ruin the face and my beginner’s luck. I finelined his left mouth corner, to give the face more expression from a distance.
Coat: The exact coat colour
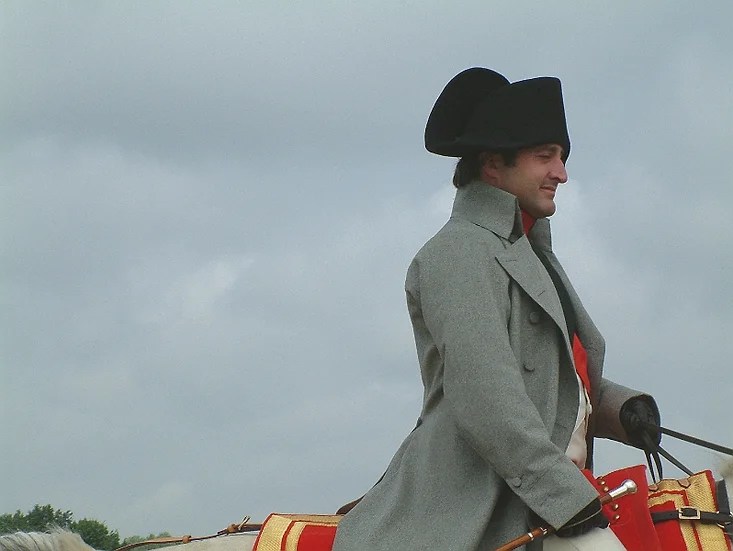
Napoleon wears his ‘redingote’ – the French word for riding coat, the late 18th century version of the trench coat.
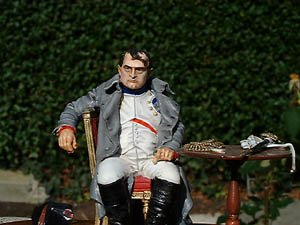
Marlon Brando wears the coat in a 1954 romance ‘Desiree’ about a Napoleon, Bernadotte and a woman. Brando influenced Andrea.
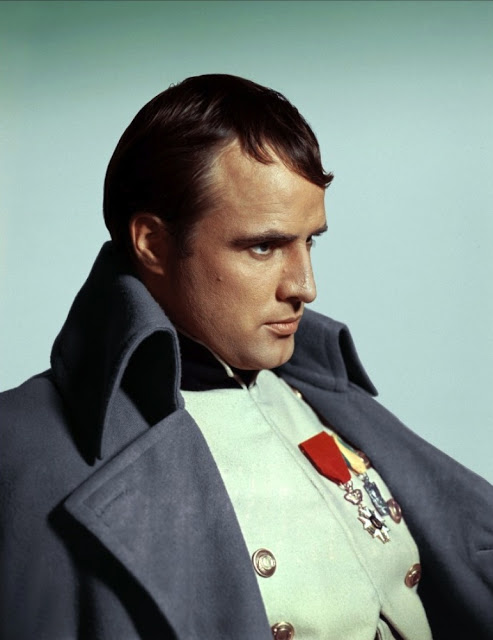
Navy blue. Movie and catalogue picture are both influenced by the DeLaRoche redingote: blueish, navy grey.

They’re even bluer than Delaroche’s redingote colour choice
Again, I checked online sources. The ‘right’ Napoleon redingote colour is according to replica makers the medium light grey, not the Marlon Brando navy grey. See below.
I originally had blockpainted the coat mid grey, with a blue wash, and then a dark wash, for the deepest shadows, for an Andrea/Marlon Brando navy grey. Seven years ago that seemed right, now I corrected that with a lighter grey drybrush and off-white tones.
Tunic and trousers are grey primer/white drybrush/dark wash – but that looked like a Napoleon in dirty laundry – so I finished with some more off-white/brown wash/off white drybrush/white highlights. Hands in the same pale colour as the face. I highlighted the boots with brown and grey and Army Painter dull coated Napoleon. The hat was simple.
Here’s the final result. I’m proud. It’s beyond my own expectation.